This was the first thing I have done that I consider as a "project". mainly because the work process that I went through, will become similar in later projects.
Also, this is the first project that had both hardware and software components.
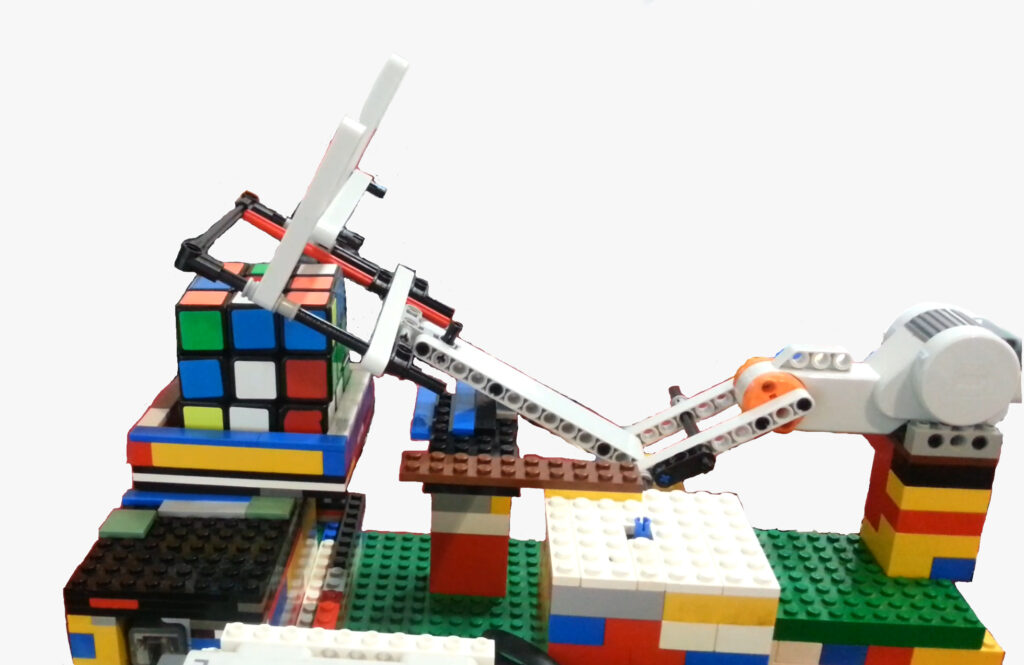
Preview
The motivtion
Back in 2014, I started to solve the Rubik’s cube as a hobby, and quickly I’ve got more engaged in the hobby and invested more time in practicing 3×3 solves.
I will write a lot more about my cubing journey over the last 7 years. But for this post, at the time of 2016, I solved mainly 3×3 and spend a lot of time practicing.
While practicing I got annoyed from having to scramble the cube each time I finish solving, so after a while, I decided to build a robot that would scramble the Rubik’s cube instead of me.
There were two main reasons for this. The first was laziness, I just didn’t like to spend time scrambling my cube instead of solving it. The second was because I wanted to make my practice more efficient and change them to more deliberated practice.
How to start?
I had minimal experience with robotics, I did some minor things with Arduino but not much more, so I didn’t think about this direction for the build because it seemed too intimidating to me.
On the other hand, I had a lot of experience with LEGO. I have been building with LEGO since I was a little kid, and I felt comfortable with it as a base material for building. I had a LEGO NXT Mindstorms that was laying around for a couple of years so I decided to give it a go and use it.
The research part of the project was pretty straightforward and was from the kind I like the most: Youtube. Because there are plenty of YouTube videos of Lego Rubik’s cube solvers, I just needed to see a lot of videos.
So, I spent a day or two watching dozens of YouTube videos, to think about what the robot should look like, mainly I tried to understand how to make the mechanical design of the rotating and flipping arms of the robot should look like.
When idea meets reality
After I saw a lot of the videos, I had a solid idea about the mechanical design that the robot should be like.
But as I found out quickly, my ideas were far too complicated for my mechanical knowledge and building experience.
I imagined that I’ll make a robot with a complex gear system that would enable me to rotate the cube faces from a couple of different angles.
As I started building, I realized that I should make the simplest design that would fulfill the desired goal. So, I built a construction that was connected directly to the cubes’ motor itself, without any gears or adapters as I imagined, and I changed the design 4 times before finding a solid one.
Then I had to build the part that would flip the cube. This was also a struggle because the motion to flip the cube wasn’t simple for me, after 7 (!) different designs I managed to find a good design that worked.
(Watch the video to see some of the versions that didn’t work)
When I finished the project, I felt that I had learned a lesson about "idea vs. real-world application", sometimes it is better just to start building, and find the working design through a trial-and-error process instead of thinking of the perfect solution.
Final mechanical version
The final mechanical version was very different from what I imagined.
- The cube rotating base was mounted directly on the Lego motor which caused it to be shaky
- The flipping arm needed to have fine adjustments in the width to be able to flip the cube
- I had to add support for the cube when it flips
- It worked just with a specific cube
- I added a small block in the base of the flipping motor so it will get the right angle
But eventually the robot works. I think this point is important to emphasize because sometimes we have an idea for a project and we imagine it will look like one thing, while it turns out to be something else.
If it still fulfills the initial goal, then it’s fine and we need to be open-minded for changes along the way and realize that it will probably not look like the greatest project we saw on YouTube.
Programming
This was also a major part of the project. At first, I thought to program with the regular NXT language, but after trying it I didn’t find it intuitive enough for me. At this time, I knew Java from school so I decided to check if there was an option for Java programming with NXT, and there was!
LeJOS is an alternative firmware that you can flush to your NXT brick, and then you can program in java and upload your script to the robot it using java. It is quite intuitive, for example, To move the motor forward you just write Motor.forward().
The programming itself was quite interesting and challenging. The main challenge was to figure out to move each face of the cube, while I can rotate the cube only on one axis and flip it also on one axis. While I wanted to make it also as efficient as possible to make the scrambling time the shortest.
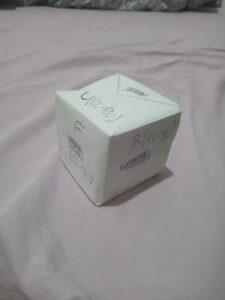
As a matter a fact I don’t remember how I solved this problem, and I didn’t manage to find the code I wrote back then. But I do have my paper cube model that I used to think about how to calculate which moves I need to apply the cube.
Extra Thoughts
POC vs stable product
When I finished the project, I can count on one hand the number of times I used it for scrambling the cube when practicing.
It took about 2 minutes for a single scramble, while I scramble the cube in about 15 seconds, so it was a bit unpractical. Furthermore, it wasn’t consistent enough and there were many times it missed moves, got stuck, and didn’t turn properly.
This happens to me in some projects that I want to build with the goal of using them later. Many times, when you make a project the first version of a working product could take X hours, and to make a better version that is more stable and consistent it can take another X hours!
That is a mental challenge that I face when doing this kind of project because I like the part of the POC (Proof of Concept) of making stuff. I like to push my limits and I feel that the POC is my main challenge when I prove to myself that I can do it the motivation to make a stable product is much lower.
You will hear a lot more about this in future projects I’ll write about. Especially when I’ll write about the 3d printer I built, there I managed to keep the motivation high even after finishing the first POC and made it a stable product.
Project in One week
I did this project in one week and worked on each day all day. I love working on a project this way and I wish I’ll have more opportunities like this.
It is hard to describe the passion and engagement you get from working only on a project for one week straight, I highly recommend trying it.
It has a lot of ups and down’s but I think that the moment you succeed is worth it all.
Design less, Try more
This is a valuable lesson. Many times, I put too much time into research or planning, I don’t mean to underestimate the importance of research and the design process.
But when you feel that you are researching or designing because you are not confident in your skills/design, this is the time to start working and trying things out, eventually, you will find the right way to do the project with your skills, design, and material available.
This is one of the things that I wish that more makers would show in their videos. Most of the times they would just talk about the final and working product and they don’t share the work process, the design that failed, and ideas that changed along the way.
Keep making and until the next project, roto